
How to Build a Backyard Shelter That Actually Works in Real Life
Building a dog house for a Husky sounds easy until you start thinking about what your dog actually needs. Most DIY plans focus too much on the box itself and not enough on the way Huskies use outdoor space. That is exactly where many homemade dog houses go wrong. The structure may look solid, the measurements may seem generous, and the roof may even be neatly finished, yet the dog still chooses to lie beside it instead of inside it.
That usually happens because the builder is solving the wrong problem. A Husky does not need a tiny insulated cave just because it is a northern breed, and it does not need an oversized wooden shed just because it is a medium-to-large dog. What it needs is a shelter that stays dry, blocks wind, avoids trapped heat, and feels stable enough to rest in without becoming stuffy or damp. If you build with those priorities in mind, the result will be far better than simply copying a generic dog house plan off the internet.
This guide is written for that exact purpose. Not to give you a cold list of dimensions and leave you guessing, but to walk you through how to build a practical Husky dog house for a backyard setting, what materials are actually worth buying, where DIY builders usually make mistakes, and which small details make the difference between a dog house that gets used and one that turns into yard decoration.
Start with the real problem: Huskies do not need “more warmth” as much as they need better shelter
A lot of first-time builders over-insulate a Husky house because they assume cold is the biggest issue. In most backyard situations, it is not. A healthy Husky usually handles low temperatures better than heat, poor airflow, damp flooring, and direct wind. That means your design should not aim to create a sealed hot box. It should aim to create a dry, wind-buffered resting place with enough ventilation to stay comfortable.
This changes the whole build. You are not making a heavily enclosed crate. You are building a raised, weather-resistant shelter with a stable roof, a protected entrance, and interior space that feels secure without trapping stagnant air. Once you understand that, the material choices become clearer and the build becomes much more practical.
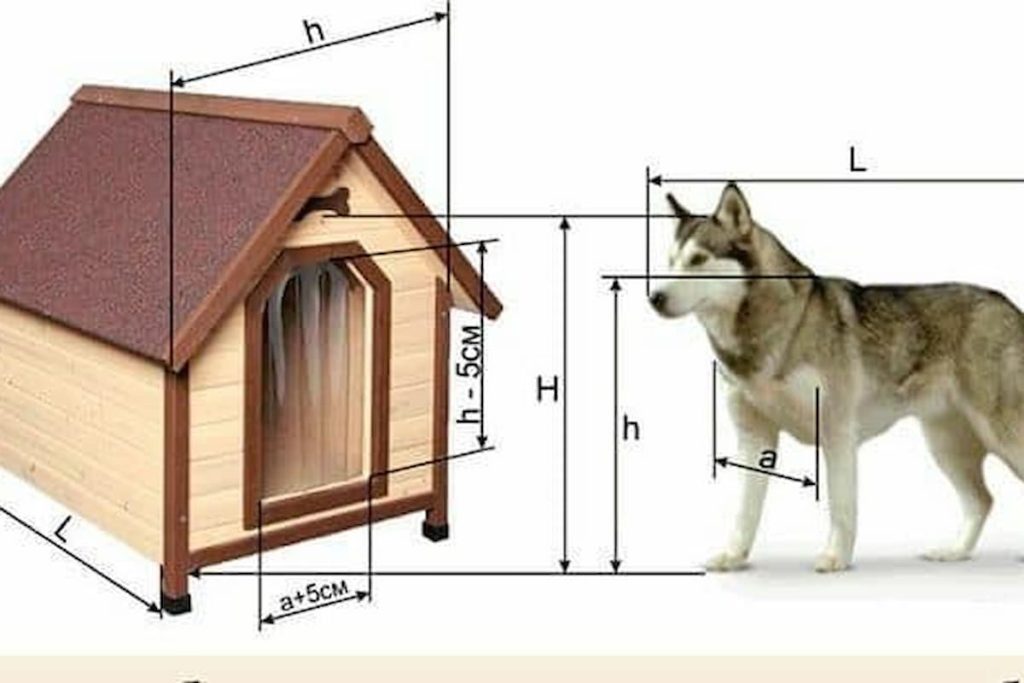
Before you cut a single board, get the size right in a way that makes sense for a Husky
One of the most common DIY mistakes is building too big. People assume a larger structure will feel more luxurious, but for dogs it often does the opposite. If the interior is too open, it feels exposed, wind moves through more easily, and the shelter becomes less inviting. For a Husky, that means the dog may step inside, turn once, and go back out.
A good Husky dog house should let your dog enter without ducking excessively, turn around without struggling, and lie down comfortably without leaving huge empty zones around the body. You are aiming for a shelter, not a mini shed.
For most adult Huskies, an interior around 42 to 46 inches long, 30 to 34 inches wide, and 32 to 36 inches high usually works well, depending on build and coat. If your Husky is particularly large, lean toward the upper end, but do not automatically make the structure enormous. The more important decision is not the exact inch count. It is whether the space feels protected once the dog is inside.
If you are unsure before building, mark the footprint on the ground with tape or flattened cardboard and watch how your dog steps into it, turns, and settles. That quick test often tells you more than any online chart.
The best DIY materials are the ones that hold up to weather, not just the ones that look good in the garage
For a Husky dog house, wood remains the best overall choice for most backyard builds because it is sturdy, workable, naturally more temperature-stable than thin plastic, and easy to customize. But not all wood choices are equal.
Pressure-treated lumber is useful for the base frame if it is not going to be directly chewed or licked, because it handles ground moisture better. For the visible structure, many DIY builders prefer cedar, exterior-grade pine, or fir plywood. Cedar is especially attractive because it resists insects and moisture naturally, though it costs more. Pine is more budget-friendly and works well if it is properly sealed.
For the walls and roof panels, exterior-grade plywood is usually the practical option. It gives you rigidity without adding excessive weight. Thin decorative paneling may look neat at first, but it often warps faster outdoors and does not hold up under real weather exposure.
The floor matters more than many people expect. A Husky dog house should never sit flush on wet ground. Even the best walls and roof cannot make up for a floor that constantly pulls in cold moisture. That is why the base should be lifted several inches off the ground from the start.
Materials that are actually worth buying
If you want a dog house that lasts through seasons instead of one summer, these are the materials most worth spending on:
Lumber and panels
- 2x4s for the base frame and roof frame
- Exterior-grade plywood for walls, floor, and roof decking
- Optional cedar boards if you want a more finished exterior look
Weather protection
- Exterior wood sealant or pet-safe outdoor paint for the outside only
- Roofing felt or waterproof membrane
- Asphalt shingles or corrugated roofing panels for rain protection
Hardware
- Exterior screws instead of nails, because they hold better over time
- Heavy-duty hinges if you want a lift-up roof for cleaning
- Galvanized brackets for added frame strength in windy areas
Comfort and function
- Rigid foam board insulation only if you live in a truly cold and wet climate, and only inside enclosed wall cavities where the dog cannot reach it
- Rubber feet, pavers, or treated skids under the base to keep the house off the ground
- A removable outdoor mat or elevated dog pad inside
One thing worth avoiding is soft fiberglass insulation in an exposed DIY build. It only works if the wall cavity is fully sealed and protected. If there is any chance your dog could scratch into it or moisture could seep in, it becomes more trouble than benefit.
Tools that make the build easier, cleaner, and safer
You do not need a professional workshop, but you do need tools that let you cut straight and assemble firmly. A crooked dog house is not just ugly; it usually leaks sooner, shifts more under weight, and creates weak roof lines.
The most useful tools for this project are:
- Circular saw or miter saw
- Drill/driver
- Measuring tape
- Carpenter’s square
- Pencil and chalk line
- Clamps
- Sandpaper or orbital sander
- Paintbrush or roller for sealant
- Utility knife for roofing materials
A jigsaw is helpful if you want to cut a rounded doorway, but it is not essential. If you are keeping the shape simple, a circular saw and drill will do most of the job.
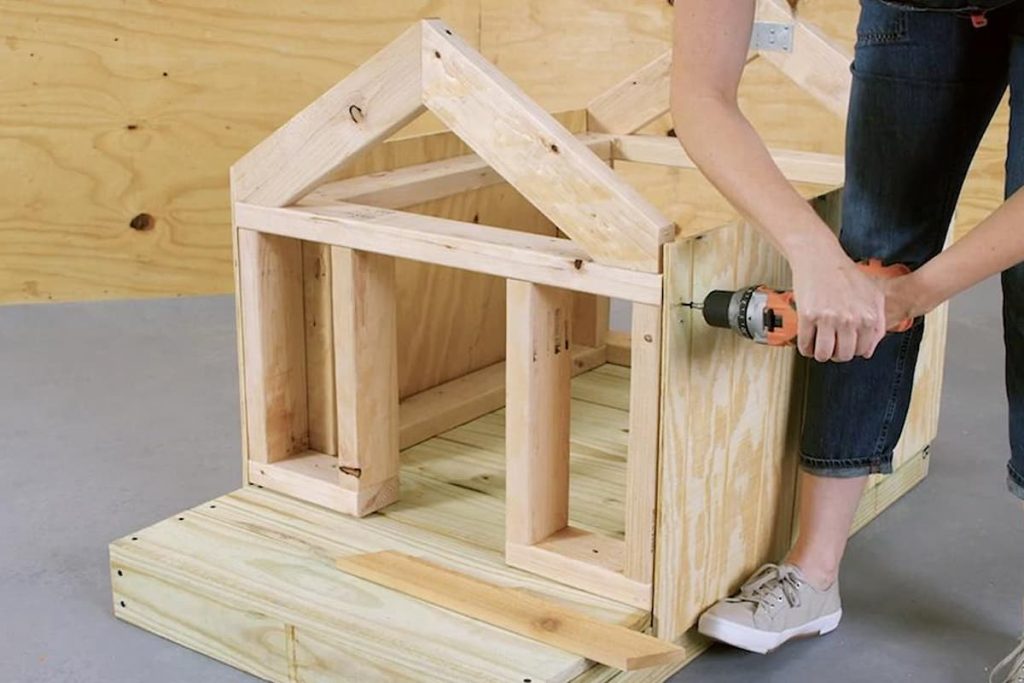
Build the base first, because this is where most bad dog houses fail
The base is not the exciting part, which is exactly why people rush it. But in real backyard use, it decides whether the house stays dry, level, and worth using.
Start with a rectangular frame made from 2x4s. Add at least one or two internal supports so the floor does not flex when the dog steps inside. Then mount plywood over the frame to create the floor platform. Most importantly, raise the platform off the ground using treated runners, pavers, or short support blocks.
That gap underneath matters more than decorative trim ever will. It keeps the floor from wicking up moisture, helps air circulate beneath the house, and gives the whole structure a longer life. In rainy yards, this detail alone can determine whether the interior stays usable.
If your yard slopes, level the build site before placing the base. A slightly uneven dog house may not seem serious at first, but over time it affects roof drainage, door alignment, and overall stability.
Wall construction should focus on blocking wind without trapping stale air
Once the base is built, frame the walls using 2x2s or light 2x4s depending on how sturdy you want the structure. The rear wall should usually be slightly taller than the front if you are building a sloped roof, which is one of the most practical roof styles for backyard weather.
The doorway deserves more thought than many DIY plans give it. A centered doorway looks balanced, but for a Husky it is often better to place the entrance slightly off-center. That creates a more protected interior area where the dog can lie away from direct airflow. In a windy yard, that small design choice makes the shelter feel much calmer.
The doorway should be large enough for easy entry but not so oversized that it turns the front wall into one giant opening. That is a frequent mistake in homemade builds. It may look generous, but it reduces protection and weakens the feeling of shelter. A Husky does not need a dramatic front opening; it needs a controlled one.
Ventilation should be added near the upper wall area or roofline rather than by making the entrance huge. Small vents on the sides near the top help warm air escape while keeping the lower resting zone more protected.
The roof is where you either build a real shelter or just a box with a lid
A flat roof is easier to cut, but it creates more long-term problems. Rain sits on it, debris collects on it, and even small leaks become recurring headaches. A sloped roof is the more practical choice for almost every backyard dog house.
Build a simple single-slope or peaked roof with enough overhang to protect the doorway. That overhang matters. Without it, rain hits the entrance directly, and the inside gets wet faster than people expect.
If you want easier cleaning, make one side of the roof lift up on hinges. That is one of the smartest DIY upgrades you can add. A dog house that cannot be easily cleaned always becomes dirtier than you intend, especially with a Husky coat shedding through the seasons.
Once the roof frame is built, cover it with exterior plywood, then roofing felt or waterproof membrane, then your top roofing material. Shingles work well for a more finished appearance, while corrugated panels are often faster and more durable in wet climates.
Insulation is useful only when it is done properly
There is a strong temptation to insulate every dog house, but sloppy insulation causes more trouble than no insulation at all. If you live in a mild or warm climate, the priority should be shade, air movement, and dryness. In that case, skip heavy insulation and build a cleaner, more breathable structure.
If you do live in a cold, damp climate, rigid foam board inside sealed wall cavities can help stabilize the interior. But it should never be left exposed. Huskies are intelligent, curious, and strong enough to damage weak interior finishes. If the insulation can be reached, assume it eventually will be.
The smarter approach is to insulate only if your climate truly requires it, then cover it fully with an inner wall layer. Done well, this improves weather stability. Done poorly, it creates a chewable, moisture-prone problem.
The little details that decide whether your Husky actually uses the house
This is the part many DIY tutorials skip, yet it is often where success really happens.
A dog house can be structurally sound and still fail because of small, practical details. Sharp interior edges, low-quality floor paint that stays tacky, a doorway facing the strongest wind in the yard, or a roof overhang that is too short to block rain—these details change how the space feels.
The interior should be smooth, easy to wipe down, and free from splinters or exposed screw tips. The floor should not be glossy and slippery. A removable outdoor mat works better than a permanently soft bed in many backyard situations because it is easier to clean and dry.
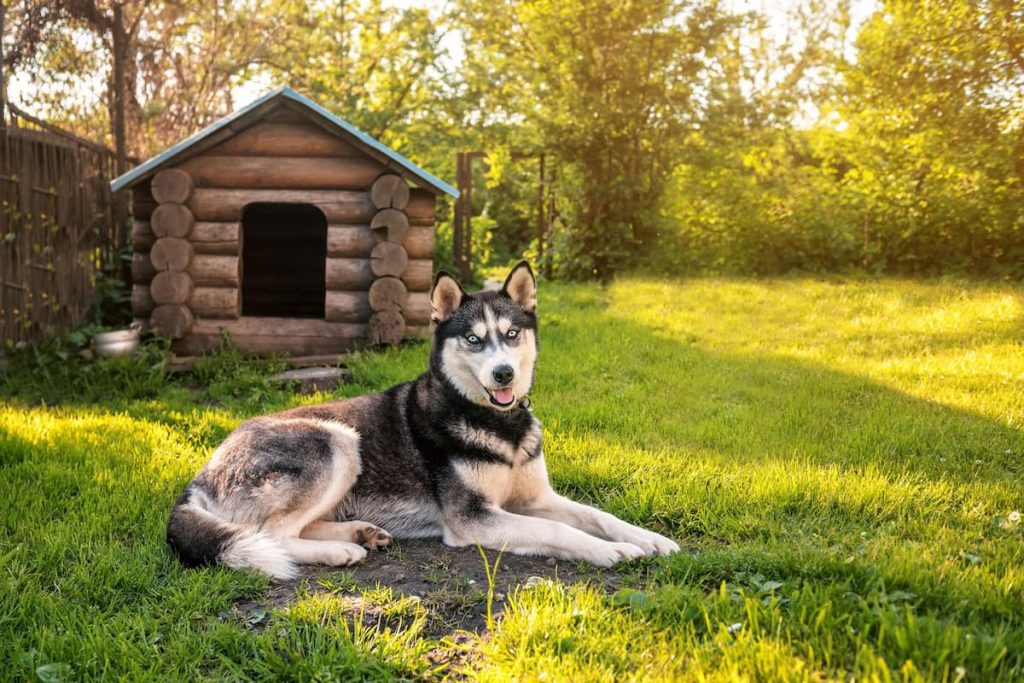
Placement matters just as much as construction. Even a well-built Husky house may be ignored if it sits in full afternoon sun or faces constant wind. The best spot is usually somewhere shaded for part of the day, protected from the strongest wind direction, and not directly in a high-traffic path.
One of the most practical finishing touches is a clear vinyl or flexible weather flap over the doorway if you live in a windy or rainy area. Some dogs accept these immediately, some need time, but they can greatly improve wind protection once introduced properly.
If your first build feels “off,” do not tear it apart too quickly
Sometimes a DIY dog house is mostly right but still not being used. That does not always mean the whole project failed. Often the fix is smaller than you think.
If your Husky avoids the house during warmer weather, check whether it is overheating from sun exposure or poor airflow. Moving it into better shade may solve the problem without changing the structure.
If the dog enters but does not stay, the interior may feel too open or too exposed to wind. Adding a mat, repositioning the entrance away from the wind, or improving the doorway cover may make the shelter feel more usable.
If the house smells damp after rain, focus on the base and roof drainage before anything else. Moisture problems rarely solve themselves, and dogs notice them immediately.
In other words, do not judge the entire build just by the first day. Watch how your dog interacts with the space, then adjust the details that are affecting comfort.
A well-built Husky dog house should feel calm, dry, and dependable
That is the standard worth building toward. Not just something that matches the fence, not just something big enough to photograph well, but something that works in actual backyard conditions.
When done right, a Husky dog house does not need to look complicated. It just needs to do a few things exceptionally well. It should stay off the wet ground. It should hold its shape in wind and weather. It should keep rain out without trapping stale heat. It should give the dog a place to settle without feeling boxed in or exposed.
Once you build with that goal in mind, the project becomes much clearer. Every board, every cut, every small design decision starts answering the real question: not “How do I build a dog house?” but “How do I build one my Husky will trust enough to use?”
That is what turns a DIY project into a practical one.


